Programming a LiftMaster garage door keypad allows homeowners to control garage access with ease while adding an extra layer of security to their property. It eliminates the need for keys or remotes, making daily routines smoother and more efficient. This guide covers everything needed to complete the process with confidence, providing clear, step-by-step instructions that make LiftMaster keypad programming simple, even for those with no technical background.
Understanding how to program a LiftMaster garage door keypad is essential for keeping the system reliable and easy to use. Whether you need to program a new keypad, reprogram an existing one, or troubleshoot common issues, this guide explains the entire process, includes troubleshooting tips, and highlights important maintenance steps to ensure long-term performance. With this information, anyone can take control of their garage access and keep their property secure without hiring a professional.
Understanding the Importance of Keypad Programming
Programming your LiftMaster garage door keypad boosts both safety and ease of use. It keeps your garage secure by allowing access only to people who know the correct LiftMaster keypad code. This simple step adds extra protection to your home and makes garage keypad access part of your daily routine.
A programmed keypad is helpful when remotes stop working or batteries run out. You can still open your garage anytime without stress. It also lets family members enter using a shared garage entry code, so no one needs to carry extra remotes or worry about getting locked out. This added convenience is one reason many homeowners prefer LiftMaster wireless keypad programming for everyday access.
Knowing how to program your LiftMaster keypad gives you more control over your garage system. You can quickly update or change your LiftMaster keypad code, reprogram the keypad when needed, fix small issues, and avoid unnecessary service calls. This smart skill supports keypad security and keeps your garage running smoothly with minimal effort or cost.
Common Issues with LiftMaster Garage Door Keypads
LiftMaster garage door keypads are handy, but like any device, they can have problems. Knowing the common issues helps you fix them fast and keep your garage access smooth and stress-free.
- Incorrect Programming: If steps are skipped or entered incorrectly, the LiftMaster garage door keypad won’t work. Always follow the instructions closely.
- Dead or Weak Batteries: Low or dead batteries stop the garage keypad from working. Replace them regularly to keep it responsive and reliable.
- Weather-Related Damage: Harsh weather, like rain or freezing temperatures, can cause keypad failure. A weatherproof cover helps protect it from damage.
- LiftMaster Keypad Not Working: A LiftMaster keypad may stop working because of weak batteries, incorrect programming, signal interference, or worn components. If your LiftMaster keypad is not working, start by checking the batteries and verifying the code before attempting more advanced troubleshooting.
- Blinking or Flashing Keypad Lights: A LiftMaster keypad blinking or flashing unexpectedly may indicate a programming error, low battery power, or communication issues with the opener. In many cases, resetting or reprogramming the keypad can restore normal operation.
Understanding these common issues makes LiftMaster keypad troubleshooting easier. With quick checks, battery replacement, and an occasional LiftMaster keypad reset, your keypad can remain reliable, secure, and easy to use for years.
Easy Steps Guide to Programming a LiftMaster Garage Door Keypad
Programming a LiftMaster garage door keypad is easier than it sounds. Whether you’re setting up a new keypad or need to reprogram a LiftMaster keypad, these simple steps will help you complete the process quickly and securely. This guide walks you through every step to make the setup smooth and stress-free from start to finish.
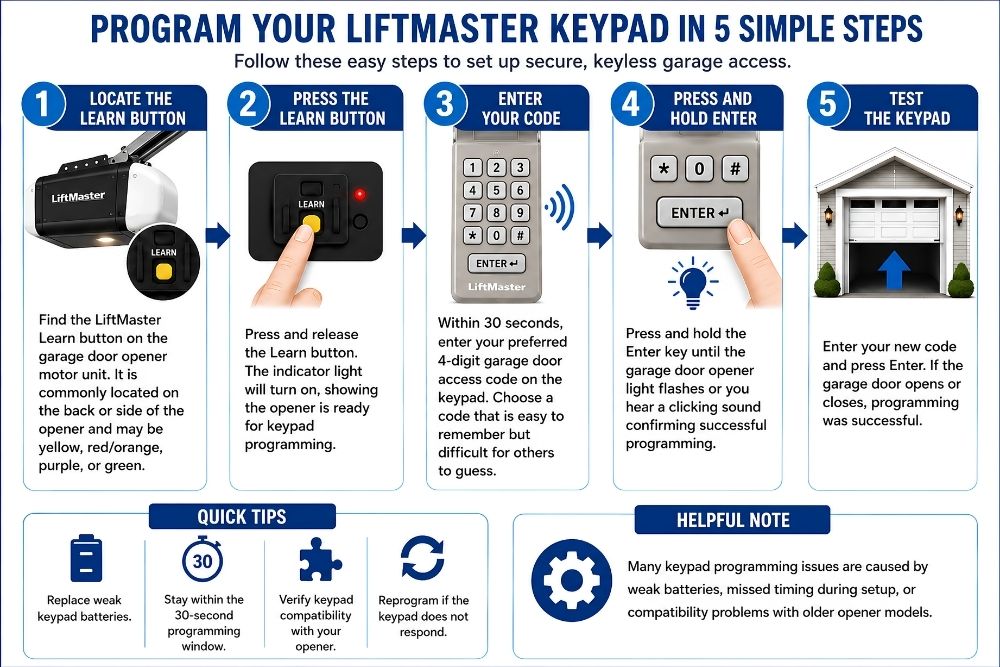
Step 1: Locate the Learn Button
Find the Learn button on the garage door opener, usually near the motor. If you cannot locate it or recently reset the opener, understanding the LiftMaster Learn button location can make programming much easier.
Step 2: Press the Learn Button
Press and quickly release the Learn button. A small indicator light will turn on, showing that the opener is ready for LiftMaster keypad programming.
Step 3: Enter the Desired Code
Within 30 seconds of pressing Learn, go to the keypad and enter your desired LiftMaster keypad code. Choose a code that is easy for you to remember but difficult for others to guess.
Step 4: Press and Hold Enter
Once you enter your code, press and hold the Enter key on the keypad. Wait for the garage door opener lights to flash or for a clicking sound that confirms the LiftMaster keypad programming process was successful. If there is no response, repeat the steps and verify that the code was entered correctly.
Step 5: Test the Keypad
Enter the new code and press Enter. The garage door should respond immediately. If the keypad does not work, you may need to verify the code, repeat the programming steps, or perform additional troubleshooting.
Note: If you recently replaced batteries, changed the access code, or installed a new opener, you may need to reset and reprogram the LiftMaster keypad before it will communicate properly with the garage door opener. If the opener was recently reset, reconnecting the system may also be necessary before all features work normally.
Troubleshooting Programming Problems
Sometimes, even when the setup looks perfect, your keypad might stop working. These troubleshooting tips can help fix most problems quickly and keep things running smoothly.
1. Check and Replace the Batteries
A weak or dead battery is one of the most common reasons a LiftMaster keypad stops working. Try installing fresh batteries and test the keypad again. Low battery power can also cause a LiftMaster keypad to blink or respond inconsistently. Try installing new batteries to restore power and test the keypad again.
2. Try Reprogramming the Keypad
If new batteries don’t solve the problem, try to reprogram the LiftMaster keypad. Sometimes the access code does not save correctly during the initial setup. If the issue continues, you may also need to reprogram the LiftMaster remote after resetting the opener.
3. Double-Check the Code Entry
Entering the wrong code or skipping steps during setup can cause issues. Carefully re-enter the code and follow all instructions exactly to avoid errors.
4. Inspect for Dirt or Damage
Dirt, dust, or stuck buttons can mess with your keypad. Wipe it clean with a dry cloth and check for physical damage that may need fixing. Damaged buttons can sometimes cause a LiftMaster keypad to flash or enter incorrect codes.
5. Use the LiftMaster Manual or Support
For ongoing problems, check the LiftMaster manual or contact customer support. If the keypad still isn’t responding after troubleshooting, the issue may be related to the garage door opener itself rather than the keypad. You can also explore online forums for tips from users with the same model.
Fixing LiftMaster keypad issues is often quick and easy with these steps. Whether the keypad is blinking, not responding, or needs to be reprogrammed, a few simple checks can usually restore reliable garage access without professional help.
Maintenance Tips for Your LiftMaster Garage Door Keypad
Proper maintenance of your LiftMaster garage door keypad ensures longevity and reliable performance. Following a regular garage door maintenance schedule can help prevent keypad issues and keep the entire garage door system operating smoothly. Here are some tips to keep in mind:
1. Regularly Check Batteries
Check the batteries every six months to make sure your LiftMaster keypad works properly. Replace them with fresh ones when needed to avoid access problems.
2. Clean the Keypad
Wipe the keypad gently with a soft cloth to remove dust, dirt, and grime. Keeping it clean helps maintain proper button response and long-term performance.
3. Protect from Weather
Install a weather-resistant cover to shield your garage keypad from rain, snow, and extreme heat. This small step prevents weather damage and extends the keypad’s life.
4. Check for Physical Damage
Look over your keypad regularly for cracks, loose buttons, or worn parts. Fix small issues early to avoid bigger problems that could stop it from working.
By following these maintenance tips, you can help extend the life of your LiftMaster garage door keypad, improve reliability, and reduce the risk of unexpected access problems.
Upgrading Your LiftMaster Keypad: What You Need to Know

As technology evolves, upgrading your LiftMaster keypad can enhance security and add new features. Newer LiftMaster keypad models often offer improved wireless connectivity, better security, and easier keypad programming. When considering an upgrade, research the latest models to find one that suits your needs and offers advanced capabilities such as smartphone integration or enhanced security features.
Before purchasing a new keypad, check LiftMaster keypad compatibility with your existing garage door opener. Most modern LiftMaster keypads are compatible with various models, but it’s important to confirm compatibility before purchasing to avoid installation issues.
Installing a new keypad often involves similar steps to programming, but it’s recommended to follow the specific instructions provided by the manufacturer. Most LiftMaster wireless keypad programming procedures require access to the opener’s Learn button during setup. This helps ensure the new device is set up correctly and functions as intended.
Conclusion
Programming a LiftMaster garage door keypad is a smart way to improve home security and make daily access more convenient. With the right code and proper steps, you can control who enters your garage. It is a simple task that adds real value to your home.
If you run into any trouble while setting up your keypad, you are not alone. Many homeowners face issues such as a LiftMaster keypad not working, failed programming attempts, or problems after a battery change. Mojo Garage Door Service offers dependable help, including expert garage door repair in San Antonio, TX, to keep everything working smoothly.
Now is the time to take full control of your garage access. Using and understanding a LiftMaster garage door keypad can help you avoid hassle, save valuable time, and make future keypad programming or code changes easier. For repairs, support, or friendly advice, reach out to Mojo Garage Door Service and enjoy peace of mind every day.
FAQs
Is there a default code for LiftMaster keypads?
No, LiftMaster keypads do not come with a default code for security reasons. You must create your own LiftMaster keypad code during the initial programming process. This adds protection to your garage door and helps prevent unauthorized entry.
Can I program a temporary code on my LiftMaster keypad for guests?
Yes, it’s possible to set a temporary access code on your LiftMaster keypad. This guest code will expire after a set time or number of uses. It’s a great feature for visitors, deliveries, or service workers needing temporary garage access.
What to do if the LiftMaster keypad works but won’t open the garage?
If your LiftMaster keypad lights up but doesn’t open the garage, check the battery first. If that’s not the issue, try to reprogram the LiftMaster keypad or reset the garage door opener. Also, make sure the lock button on the wall control is not activated.
Does every LiftMaster keypad work with all LiftMaster models?
Not every LiftMaster keypad works with all LiftMaster models. Make sure your keypad is compatible with your specific garage door opener model. Checking LiftMaster keypad compatibility before purchasing can help avoid setup and programming issues. Find the model number and look through the keypad’s manual or use LiftMaster’s online compatibility chart for reference.
How Do I Reset a LiftMaster Keypad?
To reset a LiftMaster keypad, press and hold the reset or Learn-related programming sequence recommended for your model. After resetting, you will need to reprogram the keypad with a new access code. Always consult the owner’s manual for model-specific instructions.